So now my assignment is finished I thought I would do a post to reflect on the module.
At the beginning of the module I was at best very unsure how I would do as I hadn't expected to be doing 3D modelling. But over all I can say I have really enjoyed the module and learnt a huge amount about a tool I knew nothing about but it is a tool I will certainly use in the future especially with the rise of 3D graphics on the web using WebGL and JavaScript libraries like Three.js.
I am pleased with my final work for the module but I feel there are a few things I could have done better.
Firstly I think my animation could have been smother there are one or two points where it doesn't look quite right. This could have been achieved using paths and I wish I had done that now with hindsight.
2 Other areas where I could have improved were Camera angles and some of the finer points of animation like anticipation and exaggeration.
I did manage to implement a few different camera angles within my video these were mainly at the beginning where the camera pans round the stadium and then at the start line where there are shots of the pods starting up and the countdown to the start of the race. It is also here where I have tried to use anticipation. Firstly the spinning up of the engine on one of the pods where it builds up speed and then at the start of the race where both the angle of the camera looking up and the timing of the 3 lights building up to be all red and then green.
I was pleased with my models, I would never have said at the beginning of the module that I would have been able to create them to the standard that I did.
Friday, 16 December 2011
Thursday, 15 December 2011
Rendering
During the last few posts I have briefly mentioned rendering but not gone in to much detail.
Below is the render setup window this is where you can control your rendering whether a single shot or a multi frame animation.
At the top you have the common parameters section this is where you can tell 3Dmax to create a single frame or multiple frames for animation. If you wish to animate you have to tell this section which frame you wish to render from and to.
The next section is the area to render control here you can specify what you wish to be in your final shot.
The next area controls the resolution of the output file whether a single frame or animation.
The next section adds extra controls to how you render the image.
located below the options box and out of view in the below image is the file section it is here where you specify the file format 3DS will output and where. For my animations i selected the AVI video format but you can choose many more.

One issue I encountered which did throw me during the early stages of rendering was the area to render section I had unknowingly left the area to render box on selected and wondered why all I was getting out during the rendering process was the landscape texture.
After looking at the setup again it soon became clear what I had done.

Below is an example of what I was getting out of the rendering process when I had the options left to selection.

Animation with paths....
After completing my assignment I realised that I had not animated anything with paths. so to show this process I decided to produce this blog post.
The first step is to create your mesh and then draw the path you want it to follow this is usually done with the line tool.

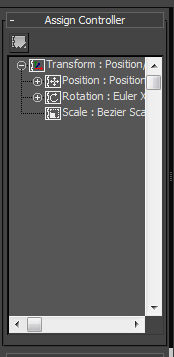
Next form the side tool bar you select the motion tab and then click on assign controller.

The next step is to select the position option from the option tree and then click on the accept button that lights up with a green tick in the top left of the section.

You are then given a window with many options, here you select the Path Constraint option and click ok.
 Then back on the tool bar ob the right you click the add path button that has appeared and then click on the path which you wish your object to follow.

Below is the timeline bar for the animation.

The first step is to create your mesh and then draw the path you want it to follow this is usually done with the line tool.

Next form the side tool bar you select the motion tab and then click on assign controller.
The next step is to select the position option from the option tree and then click on the accept button that lights up with a green tick in the top left of the section.
You are then given a window with many options, here you select the Path Constraint option and click ok.

Below is the timeline bar for the animation.
Here is the animation that was produced from the above procedure.
Wednesday, 14 December 2011
A festive particle treat…….
For a bit of fun and to learn an extra technique I wanted to play with particles. The first idea I had was to play with some smoke but in the end I found myself making a snow scene which the final video of is at the end of this blog post.

The first step is to add a particle system, for the purpose of this experiment I chose Super Spray.

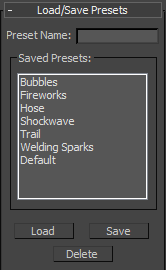
Most of the following operations take place in the modifier panel. The first of these was to load the hose preset for the particle stream.
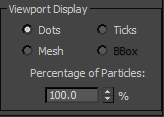
The next step was to choose dots for the viewport display and I also left the particles percentage at 100%
I also slightly adjusted the spread of the particle formulation

Because I wanted to create snow which floats down to the ground fairly slowly I reduced the particle motion down to 2 but then gave it a variation of 15% so that the flakes wouldn't look too uniform as they came down the screen.

For the partials size after some experimentation I went for 15 this seemed to create the right size flake in proportion to the scene. I also added a bit of variation just to clear any uniformity.

Once again I used the architectural materials for the snow man because I feel these give a much better finish.


After rendering a couple of times I thought that the black background that you get when your mesh is the only thing in shot didn't look very good.
To correct this I added a plane and rotated it to act as a wall and then added a nice festive snowy forest texture to it.
I also added some animation to the snowman where he looks to the left then right and then up at the snow coming down.

The Finished Article
Playing with bones
To animate something like a person in 3D max it is more efficient to create a skeleton and then skin that with mesh's and textures.
To do this you first have to create a bone structure within your mesh to do this you select the systems option from the create tab.
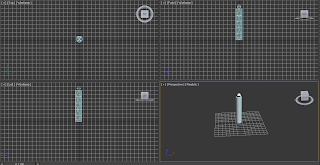
Then press the bones button to select the tool. The next step is very important it is almost impossible to create bones in the perspective view so its best to have your workspace setup with the top left and right views all set to wireframe, then you add your bones in these sections.

To apply your new bone structure to your skin you need to apply the skin modifier to your mesh to do this you simply have to select it in the usual way.
Once applied you now have to click on the add button to progress with attaching your mesh to the bones.

Below is the window that is loaded when you press the add button. Here you will see the names of each of your bones ready to be selected.
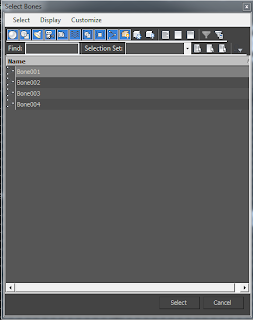
Now the user has to select all the bones they have created and then press the select button at the bottom of the window.

Now all the bones are attached to the mesh and it can be moved with them.

Below is a short animation I made using the simple bone structure created in 3Dmax.
To do this you first have to create a bone structure within your mesh to do this you select the systems option from the create tab.
Then press the bones button to select the tool. The next step is very important it is almost impossible to create bones in the perspective view so its best to have your workspace setup with the top left and right views all set to wireframe, then you add your bones in these sections.
When working with the bones it can be helpful to press alt-x this makes the mesh transparent.

To apply your new bone structure to your skin you need to apply the skin modifier to your mesh to do this you simply have to select it in the usual way.
Once applied you now have to click on the add button to progress with attaching your mesh to the bones.

Below is the window that is loaded when you press the add button. Here you will see the names of each of your bones ready to be selected.

Now the user has to select all the bones they have created and then press the select button at the bottom of the window.

Now all the bones are attached to the mesh and it can be moved with them.

Below is a short animation I made using the simple bone structure created in 3Dmax.
Tuesday, 13 December 2011
Once I had finished my individual animations I then took all the clips and bitmaps I had created in too Adobe premier where I trimmed any unrequired footage and layer in the images for the start line adjusting how long they would be displayed for.
One thing I noticed after the process was that my dies had lost a bit of their sharpness I believe this is because I created them in a resolution of 800 x 600 and then they may have been stretched to fir another resolution.
Below are a couple of shots from the process.


Making the engine spin
As part of my animation all the Pod's are sitting at the start line ready to go. I thought it would be good at this point to make the blades of the engine spin on one of my models.
To do this I first had to ungroup the model in question this is because when I imported the model it had been grouped so that resizing would work properly.
Once this was done I grouped all the blades and the centre spindle together on each engine and then selected them both and used the rotation tool to spin them as much as possible but with a little pickup at the beginning to make it look like they were building up momentum.
Below is a shot of one the engines ready to spin with the rotation tool. On the time line I used 100 frames which seemed to work well for the length of clip I wanted.

Start light animation
Just after the shot of the pods floating at the start line the camera will move to the the start lights these wil light red one at a time and then go green to start the race.

Extra material controls available in the materials window when you select architectural materials

Finally the created materials that I applied to the scene

When it came to animating the colour changes on the start lights I ran in to a bit of a problem.
No matter what I tried when it came to getting the pills to change colour the materials would not be changed by the time time. After trying many different things I decided that I would export each image as a 800 X 600 BMP file and then include and animate them with the timings I wanted when i came to bring my project together in adobe Premier.


To create the lights I created a cylinder and then squashed and stretched it to create something more like an aircraft wing.
I then created some pills from the extended primitives menu and positioned them equally across the wing. I then textured the wing with a marble texture and then created a plane which I then rotated and then gave a sky texture too. I then angled the mesh's so that the view would have would be like the pod pilots looking up at it with the sky behind.
I then had to texture the pills that make the lights. To texture these I tried something a little different, from the materials editor I chose the architectural materials this is because you are given some extra control of the materials and how they appear when rendered. I wanted my lights to have a bot of a glow to them so in the architectural material panel I adjusted the Luminance up too 500. In hindsight I could and should have taken it a bit higher.
Below image shows the selection of architectural material

Extra material controls available in the materials window when you select architectural materials

Finally the created materials that I applied to the scene

When it came to animating the colour changes on the start lights I ran in to a bit of a problem.
No matter what I tried when it came to getting the pills to change colour the materials would not be changed by the time time. After trying many different things I decided that I would export each image as a 800 X 600 BMP file and then include and animate them with the timings I wanted when i came to bring my project together in adobe Premier.


Monday, 12 December 2011
Creating the sky dome
A slightly out of sequence post…..
During the process of creating my start scene I needed to create something that would reproduce the sky.
To do this I created a geosphere and selected the hemisphere option. once this was done I then used the normals modifier to switch the normals to the inside of the primitive so that when I applied my sky texture it would appear inside the dome.
I then added am omni light to the inside to recreate the sun.
when I was looking at the geosphere during modelling I noticed there was a seam in shot so to correct this I simply just rotated the sphere so that it was no longer in shot.
The results from this technique can be seen in the previous video.
My first render
Below is my first attempt at rendering a clip while not to the standard I want for my final submission i did learn a few things.
The main one bing that you need to have a view selected to render rather and an object. for a few occasions I wondered why my terrain and nothing else was in the clip and that was why.
The main one bing that you need to have a view selected to render rather and an object. for a few occasions I wondered why my terrain and nothing else was in the clip and that was why.
Building the start line
Due to the scale of the scenes I wanted to produce combined with some issues fitting my start line section on to the first scene I had built I decided that it would be a good idea to create a separate scene for the start of the race.
At the beginning of the real clip previously featured in the blog you see the pod's lining up in a stadium area with lots of cheering fans.
To recreate this I made the stands by constructing boxes and then making them an editable poly, then moving one vertex down to create a slope with a lip at the bottom I then cloned this as required to create the other stands.
I then created 2 towers for the start line my using the cone primitive but not closing the top and then added a disk to the top I then applied the mesh smooth modifier to make them look more like the originals.
At this point I also added the large silo like building behind the stands using the cylinder and then cone primitive again to make the 2 levels that hover above it and then applied the mesh smooth modifier to both of these.
Once this was complete I then created the stepped section by creating the shape cloning it resizing and laying over again.

Once the buildings were complete I added textures to them the first items to be textured were the towers, silo & steps I applied a marble effect to these just as they have in the film.

I then tackled the grand stands to get the appearance of lots of people I googled football crowd images found something that would work and then used a UVW unwrap but just selecting the top surface I then took this in to photoshop applied the texture and then returned the image to 3D max.
Once the top texture was on you could see it bleeding on to the edges so to correct this I selected the stands at the polygon level and applied a grey stone texture to the edges. This corrected the image bleed from the UVW map of the top surface.

I then imported my pods's using the merge files option from the file menu and then set about resizing them. I had to increase the size of all the models by around 6 - 7 hundred times to get them right.
The 3 images below show the pods in position at the start line with the completed stands


I then wanted to experiment with some cameras and animation for the first time. To do this I added some cameras from the same menu as you would normally create primitives and then set about positioning them.

I discovered during this process that the best way to get your camera in the right position was to set the view of the side window to that of the camera this meant that I could work on the camera in the main perspective while seeing what it would capture in the side window.

Below is a shot that shows the graphic 3Dmax places to show the user where the camera is positioned and pointing.

Below is a shot of the time line for animation I discovered that each component effectively has its own time line so you can animate the objects individually without affection others. I also found that when animating something like a race you need to ensure that all models are moving at the same time other wise you get judder and unrealistic movement in your animation.
Sunday, 11 December 2011
When Things vanish....
During the texturing of my engines I noticed that as I rotated the model some of the engine blades would disappear. I soon realised that because I had created my engine blades with planes that they only had normals on one side.
A Normal is a marker on a side of an object that lets the renderer know how light would react on the surface and also helps tell the system what needs to be rendered in a particular shot.
To correct this problem I was advised that the shell modifier would cure this by adding normals to both sides of the blade.

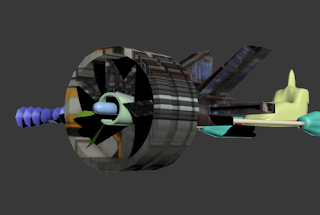
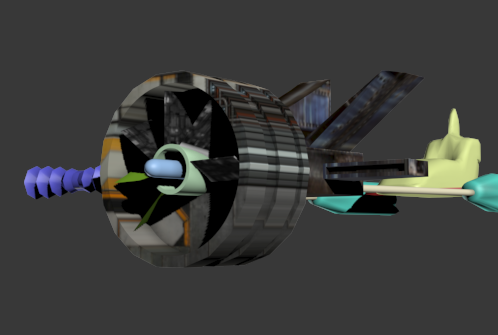
Below you have the before and after shots for the use of the shell modifier. If you look closely or enlarge the photos you can see in the bottom right hand corner off the blades a couple are missing in the top photo but not in the second.

A Normal is a marker on a side of an object that lets the renderer know how light would react on the surface and also helps tell the system what needs to be rendered in a particular shot.
To correct this problem I was advised that the shell modifier would cure this by adding normals to both sides of the blade.
Below you have the before and after shots for the use of the shell modifier. If you look closely or enlarge the photos you can see in the bottom right hand corner off the blades a couple are missing in the top photo but not in the second.

Subscribe to:
Comments (Atom)