To do this I started by using the tube tool which is located in the creation section of the right hand tool bar. Towards the bottom of the tool bar.
When you select the tube tool the parameters change at the bottom of the tool bar.
It now presents you with Radius1 which controls the size of the outer radius of the tube and radius1 which controls the inside and this allows you to control the thickness of the tube with a lot of precision.

The next step was to draw out the tube in the viewport by first dragging out the outer circle and then the inner circle this would then create the outer ring of my wheel.

Once the outer frame of the wheel was created it was time to create the inner beams of the wheel this was done by creating a cylinder narrow enough to fit within the frame but also long enough that it pertruded outside of the frame to create some handles. This was done by adjusting the height variable in the modifier section of the right hand tool window.

Once the cylinder had been drawn I then had to adjust its orientation and position. This was done using the rotate tool. First you select the object you would like to rotate and then select Rotate from the top toolbar.
You are then presented with a wireframe ball which is very much like a track ball. You then click on one of the axis and roll round to position your object. There is an easier way of doing this using the alignment tool which I will cover in a later post.

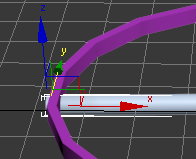
After the rotation I did some minor tweaking of the cylinders position. This is done with the move tool when you select this tool from the top tool bar you are presented with 3 axis arrows roughly forming a cube. These arrows allow you to move the object on one axis without affecting another.
When the object is selected it is also possible to hover between the axis arrows, when this is done a yellow box appears and if this is clicked you have completely free movement of the object.
Next I used the clone tool to create the 2 extra beams which would cross over the central beam.To clone an object I held down shift and then dragged a clone away on the Y axis this then prompted a input window asking me if I wanted to re-name my new object.

THe next stage was to use the rotate & move tools again to position the two cross beams.


Once this was completed I wanted to add the centre of the wheel this was done by drawing a cylinder and then looking at the other perspectives as I drew it this allowed me to see that it was level with the outer ring and the cross beams giving this final product.

No comments:
Post a Comment