A slightly out of sequence post…..
During the process of creating my start scene I needed to create something that would reproduce the sky.
To do this I created a geosphere and selected the hemisphere option. once this was done I then used the normals modifier to switch the normals to the inside of the primitive so that when I applied my sky texture it would appear inside the dome.
I then added am omni light to the inside to recreate the sun.
when I was looking at the geosphere during modelling I noticed there was a seam in shot so to correct this I simply just rotated the sphere so that it was no longer in shot.
The results from this technique can be seen in the previous video.
Monday, 12 December 2011

My first render
Below is my first attempt at rendering a clip while not to the standard I want for my final submission i did learn a few things.
The main one bing that you need to have a view selected to render rather and an object. for a few occasions I wondered why my terrain and nothing else was in the clip and that was why.
The main one bing that you need to have a view selected to render rather and an object. for a few occasions I wondered why my terrain and nothing else was in the clip and that was why.
Building the start line
Due to the scale of the scenes I wanted to produce combined with some issues fitting my start line section on to the first scene I had built I decided that it would be a good idea to create a separate scene for the start of the race.
At the beginning of the real clip previously featured in the blog you see the pod's lining up in a stadium area with lots of cheering fans.
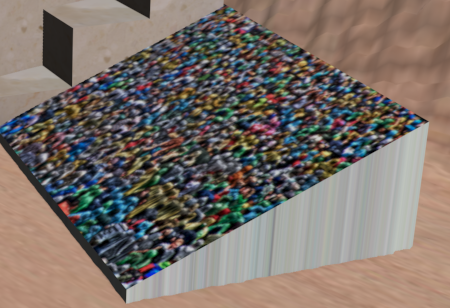
To recreate this I made the stands by constructing boxes and then making them an editable poly, then moving one vertex down to create a slope with a lip at the bottom I then cloned this as required to create the other stands.
I then created 2 towers for the start line my using the cone primitive but not closing the top and then added a disk to the top I then applied the mesh smooth modifier to make them look more like the originals.
At this point I also added the large silo like building behind the stands using the cylinder and then cone primitive again to make the 2 levels that hover above it and then applied the mesh smooth modifier to both of these.
Once this was complete I then created the stepped section by creating the shape cloning it resizing and laying over again.

Once the buildings were complete I added textures to them the first items to be textured were the towers, silo & steps I applied a marble effect to these just as they have in the film.

I then tackled the grand stands to get the appearance of lots of people I googled football crowd images found something that would work and then used a UVW unwrap but just selecting the top surface I then took this in to photoshop applied the texture and then returned the image to 3D max.
Once the top texture was on you could see it bleeding on to the edges so to correct this I selected the stands at the polygon level and applied a grey stone texture to the edges. This corrected the image bleed from the UVW map of the top surface.
I then imported my pods's using the merge files option from the file menu and then set about resizing them. I had to increase the size of all the models by around 6 - 7 hundred times to get them right.
The 3 images below show the pods in position at the start line with the completed stands


I then wanted to experiment with some cameras and animation for the first time. To do this I added some cameras from the same menu as you would normally create primitives and then set about positioning them.

I discovered during this process that the best way to get your camera in the right position was to set the view of the side window to that of the camera this meant that I could work on the camera in the main perspective while seeing what it would capture in the side window.

Below is a shot that shows the graphic 3Dmax places to show the user where the camera is positioned and pointing.

Below is a shot of the time line for animation I discovered that each component effectively has its own time line so you can animate the objects individually without affection others. I also found that when animating something like a race you need to ensure that all models are moving at the same time other wise you get judder and unrealistic movement in your animation.

Sunday, 11 December 2011
When Things vanish....
During the texturing of my engines I noticed that as I rotated the model some of the engine blades would disappear. I soon realised that because I had created my engine blades with planes that they only had normals on one side.
A Normal is a marker on a side of an object that lets the renderer know how light would react on the surface and also helps tell the system what needs to be rendered in a particular shot.
To correct this problem I was advised that the shell modifier would cure this by adding normals to both sides of the blade.

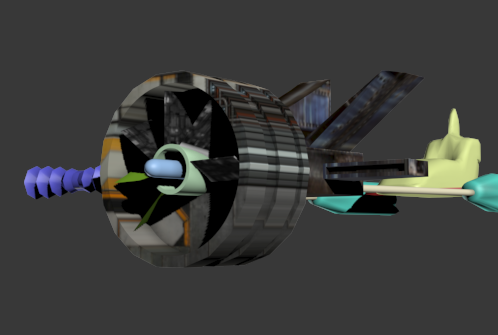
Below you have the before and after shots for the use of the shell modifier. If you look closely or enlarge the photos you can see in the bottom right hand corner off the blades a couple are missing in the top photo but not in the second.
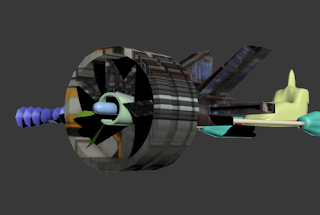

A Normal is a marker on a side of an object that lets the renderer know how light would react on the surface and also helps tell the system what needs to be rendered in a particular shot.
To correct this problem I was advised that the shell modifier would cure this by adding normals to both sides of the blade.
Below you have the before and after shots for the use of the shell modifier. If you look closely or enlarge the photos you can see in the bottom right hand corner off the blades a couple are missing in the top photo but not in the second.

Final Pod Racer textures
To texture the engines of this pod I used the UVW mapping and UVW unwrap. To perform this first you select your mesh and make it an editable poly you then add the UVW map modifier and then the UVW unwrap modifier as well.
Once this is done you can select the mesh (I found selecting at polygon level was best for this.) and then hit the unwrap button in the tool bar.
Once this was done you are presented with what looks like a very messy unwrap of your shape in a new window it is here that you select the flatten tool so that the shapes can be spread out with a much clearer layout.
Then you just have to export the UVW as a BMP and take in to photoshop to layer the textures on top of the unwrap map.
The below images just briefly step through the process.


Anakin's pod textures
For Anakin's pod I decided to import some textures that had come from the web and some that I had tweaked in photoshop.
The first texture I imported was a sort of metal tiled effect that i thought might be good to experiment with.
When I first imported it it really didn't look great and in some ways looked more like stone than the casing of an engine.

But then I played with the Rotate Mapping Tool and after a little experimentation I started to get the effect I wanted on the engines.


For the after burners I simply imported a good fire JPeg image and repeated the rotation process to create a swirling cork screw fire effect.

Next came the texture for the main pod I knew that the texture needed had to be blue and white and I managed to find a strange blue and white spayed texture online that worked perfectly to produce the effect I wanted

The first texture I imported was a sort of metal tiled effect that i thought might be good to experiment with.
When I first imported it it really didn't look great and in some ways looked more like stone than the casing of an engine.

But then I played with the Rotate Mapping Tool and after a little experimentation I started to get the effect I wanted on the engines.
Weather luck or judgement or a little bit of both the look of the engine after rotation started to look really good even managing to get some nice ring effects on parts of the engine that needed that effect to make it look as it should.

For the after burners I simply imported a good fire JPeg image and repeated the rotation process to create a swirling cork screw fire effect.

Next came the texture for the main pod I knew that the texture needed had to be blue and white and I managed to find a strange blue and white spayed texture online that worked perfectly to produce the effect I wanted

F1 Pod Texturing
Once the models were completed it was time to to start texturing them. I decided to use a different texturing technique for each model so for the F1 racer I chose to use 3D max's inbuilt textures and colours. And then apply inbuilt effects to these.
For Anakin's pod I will import the textures and then just use the rotation and positioning tools to get the texture looking how I want.
And finally for the final pod I will use the full power of UVW mapping and the UVW unwrap.
Before I textured the F1 pod i had a play with some differant textures to apply colour too first i experimented with the colours for the engines because I wanted them to have a feel of being monster like I decided to use fairly organic textures.
For the teeth that line the top of the engines I selected the Perlin Marble texture and then applied yellow with a hint of red to give them the look of rotten blood stained monster teeth


For the engine casings I decided to use the Cellular texture this is mainly because i thought it would look the best over the wider area that was the engines.


The next section to texture was the main body of the pod, As mentioned in a previous post there was more than a little inspiration from Ferrari so there could only be one colour really and that of course is red. But rather than just leave the original red from the construction process i created a new one with the metal

Once the body was textured I wanted to add a glass section I did this with the translucant material


After the texturing was complete I wanted too tweak the position of the teeth on the engine. After i had used the mesh smooth on them they weren't as prominent as i wanted so i selected them all on both engines and raised them a bit which worked well.

And here are the final textured shots of the model


Subscribe to:
Posts (Atom)